
Invoice Verification (MIRO)
Next, after material creation and purchase order on basis of goods receipts and invoice receipts, next we’ll see invoice verification. So here we’ll use a transaction code called MIRO, that is, MIRO. So this is the screen for invoice verification.
Thank you for reading this post, don't forget to subscribe!
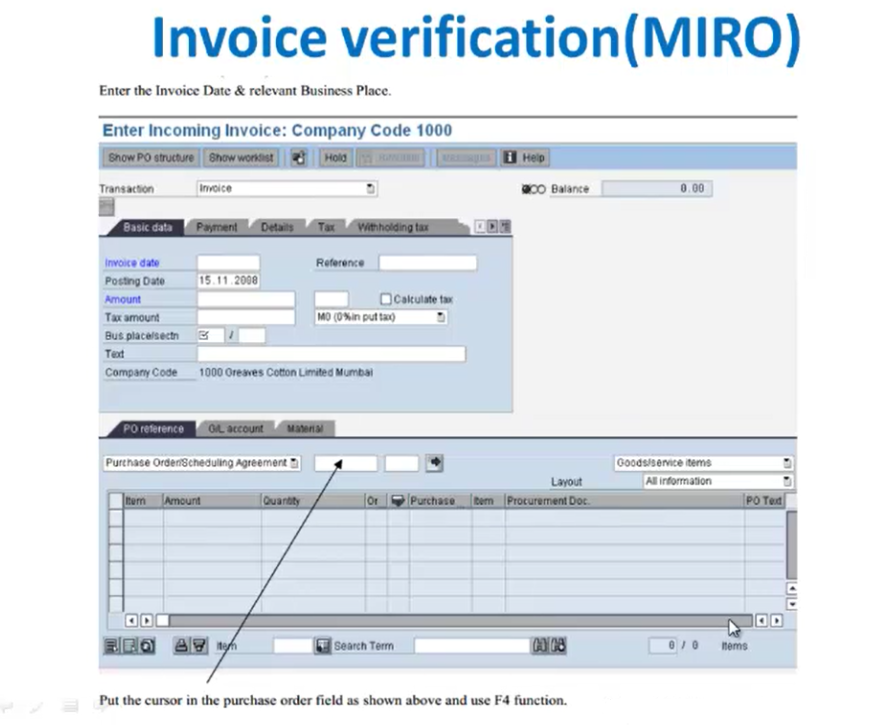
Here we have to maintain the invoice date and the relevant business place. So here we’ll maintain the invoice date and we’ll maintain the business place. After that, under this PO reference tab, we’ll put the cursor in this purchase order field and we’ll use the F4 help button. So this is the PO reference tab where we have to maintain the purchase order number. After that we’ll get a screen where we’ll have to select our purchasing document.

So for that we’ll put the vendor number in this particular field. So we’ll provide the appropriate vendor, which we require. And we’ll click on this execute button. So after that we’ll get the possible entries for that purchasing document, that is related to that vendor.

So here we’ll select this particular purchasing doc. And then we’ll say after selecting this respective purchasing doc, we’ll click on this copy button. So once we click on this copy button and press enter, we’ll get this particular screen.

So here we’ll get that doc purchasing doc under this pure reference tab. And for this purchasing doc we’ll get that appropriate invoicing date. So this is how we maintain the data for purchasing document, that is the under the pure reference tab.
Now after this we’ll select the calculate tab, that is calculate tax option and give the relevant tax type. So here we’ll maintain the tax details for this particular document.
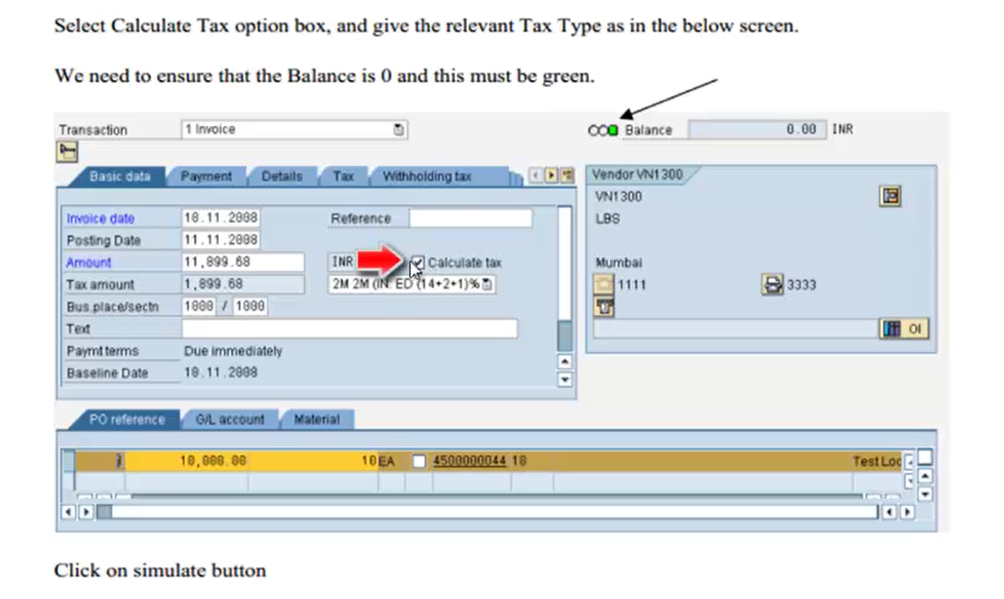
And here, once we maintain this data, we need to ensure that the balance, that is this particular color indicator, should turn to green and the amount of balance should be zero. So this thing needs to be taken care of while we maintain the tax details. So after maintaining all these details, we’ll click on the simulate button. And then we’ll take check the overview of all the entries, which we have recorded. So we’ll click on the simulate button, and we’ll get a document overview history.

So this is the document history, that is the entries, which we have created. And after verifying these entries, we’ll click on the save button. And once we click on the save button, we’ll get a message stating that the document is created. Now if in order we need to check for purchase order report, we’ll go to transaction code ME2N, and we’ll view the history of that purchase order report. So this is how we do the invoice verification with the transaction code MIRO.
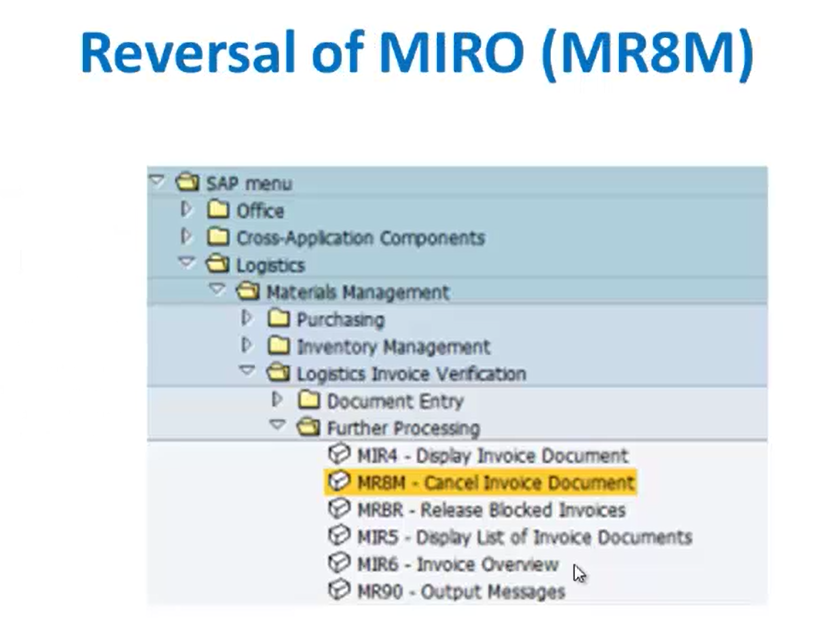
Now next, we’ll see how to do a reversal of this particular invoice verification. Now here we’ll use the transaction code MR8M. This is the SAP menu path for reversal of MIRO, that is, cancelling an invoice document. So here we’ll use transaction code MR8M or we can use this SAP menu path.
So here invoice documents and invoice verification are either invoices or credit memos, and these documents can be cancelled if there is an error. Now here there are 2 different cases. First one is for invoice and the other is for credit memo. So if an invoice is cancelled, the system automatically creates a credit memo for that invoice. And if a credit memo is cancelled, the system automatically creates an invoice. So these are the 2 different cases in invoice documents that is under invoice verification. So once we cancel an invoice, system automatically recreates a credit memo. And once we cancel our credit memo, the system automatically creates an invoice. Now here the system takes the amount and quantity for the credit memo or invoice from the invoice or the credit memo to be cancelled, Thus avoiding any differences between the invoice and the credit memo or credit memo and the invoice. So here any anything that is credit memo or invoice is cancelled the system takes the amount and quantity for that particular invoice or the credit memo and thus calculates any differences between them.
For cancel invoice document that is MR8M, here we’ll have to provide the invoice document number which we have created at MIRO and we have to provide the fiscal year for that.

Then after that, we’ll give the reversal reason and the posting date details for this particular invoice. After this, we’ll get the screen as this view.

So here we have given the invoice number, the fiscal year, the reversal reason, and the posting date. And then we’ll click on this display document button to view the MIRO details and follow on the document that is accounting documents. So after clicking on this display document we’ll get this particular screen where we have the details of the invoice, like MIRO transaction code.

This is the MIRO screen for invoice verification. So here we have the details for this PO reference which we have seen earlier and these are the basic data details. Now we have to take care about some prerequisites before we enter an invoice. Now an invoice document can only be cancelled if it was posted in logistics invoice verification, It has or not already been cancelled. And last is it is not a cancellation document for another document. So these are some prerequisites which needs to be can taken care of while cancelling an invoice document. When we cancel documents in logistics invoice verification, the document line items are not automatically created in financial accounting. It is recommended that we periodically clear such items that is using daily background jobs. So, under logistics invoice verification, the document line items are not automatically cleared in finance. So we need to use some bad jobs to clear those items when we cancel a document under logistics invoice verification.
Now we have some procedure to be followed while cancelling an invoice document. Let us see what is the procedure. The first step is we’ll choose logistics invoice verification, since we have taken example of logistics invoice verification. Then we’ll go to further processing, under that, we have cancel invoice document option. So we’ll click on that cancel invoice document option and we’ll get the initial screen of the reversal. There we’ll have to provide the invoice document number, the fiscal year, and enter the data for the invoice document, which we want to cancel. After that, we have to provide a reversal reason field. So here we’ll take the reversal reason as 2. And we’ll select the reason for cancelling the invoice. Here, it allows us to differentiate between different types of cancellations. So we can display the document to check. Now we’ll choose display document to do this. So we have an option of display document. After entering the details, we’ll click on the display document button. After that, we can look at the items of the documents to be cancelled. So after selecting those items, we can return back to the initial screen by choosing the checkbox of those items. And after that, we’ll choose invoice document, and we’ll go to post reversal document button. So this is the procedure for cancelling an invoice document. After that, we’ll click on the save button on the screen of MR8M. So after doing all those cancellations and checking of those invoice documents, we click on the save button. Once we click on the save button, we’ll get a message stating that document is reversed with the number and Please manually clear the FI documents.
Now as in under FI, we have a process that we cannot view the previous year data. So here we’ll have to clear the data for the previous year. So here we have some manual efforts to be done for finance. So after document is reversed under invoice, we’ll have to clear the FI documents manually. So this is how an invoice verification and reversal process is done under FI.
Now what would be the result for those prerequisites done for logistics invoice verification and after following those process. Now the result would be the system automatically posts a credit memo or an invoice, and we receive a message. So here the system checks an invoice created as a result of cancelling a credit memo for variances. If variances occur, the invoice may be blocked for payment if it is a message appears. So here the system checks whether an invoice is created for a cancelling of credit memo for variances. And if variances are occurred, then the invoice may be blocked for the payment. And if this condition happens, then a message appears.
Now when we cancel an invoice or a credit memo, the system creates an invoice or a credit memo from information contained in the or a credit memo from information contained in the document to be cancelled. So in the simplest form, the postings in the invoice or credit memo are simply reversed. However, this is not always possible. So for an example, an invoice is cancelled in which a material was debited. The postings can only be reversed if there is enough stock when the invoice reversal is posted. So here when an invoice is cancelled, so when a material is debited and after that it was cancelled, the postings can be reversed only if there is enough stock when the invoice reversal is posted. So equal amount of stock should be there when we do the reversal process for that particular invoice. Then if there is not enough stock, the reversal posting is made proportionally, that is, part for which there is sufficient stock coverage is posted to the stock account and the remainder, that is the remainder to a price difference account. So if in case if we reverse a particular document and we do not have enough stock for that reversal posting, then it proportionally divides the document. That is part of the stock, which is there in this material, is posted to the stock account and list is taken as a remainder to the price difference account.
Then when you cancel an invoice or a credit memo referencing a purchase order, you cannot reverse the account movements originally made. If a further invoice, the difference price was posted after the invoice that is to be cancelled. So these are the result which we get when an invoice is cancelled for a particular period. So this was invoice verification and reversal of invoice verification.