
Introduction to SAP FICO
When going for an SAP implementation project, we need to first understand the complete requirements of the client, i.e., the company. For example, let’s say we are a team of SAP consultants and we are planning to implement SAP for Doctor Reddy Labs Group, a multinational company, with its head office in India and business operations in different countries. So, how do we carry out such an implementation?
Thank you for reading this post, don't forget to subscribe!First of all, we need to understand the requirements. As a team of consultants, we need to discuss with the respective managers and departments. FICO consultants will discuss with the finance manager, the finance department, and the end users- business process owners, Sales and Distribution (SD), Production Planning (PP). This is for the purpose of understanding their business process requirement, what has been running for the existing organization, and how they want it in the future, because we are going to prepare the existing organization structure in a document, and we are going to prepare a blueprint. Once we prepare the blueprint, we’ll configure the SAP system.
So for this purpose, let us imagine that we are going for an SAP implementation for Doctor Reddy Labs Group. This group can have any number of company codes. Here, Doctor Reddy Labs is the total group, called a company in SAP terminology. Under this group, we can create any number of companies called company codes, such as “Doctor Reddy Labs Pharma” (DRLP) and “Doctor Reddy Labs Bulk Drugs” (DRLB), both in India. So the company code is a registered legal entity according to the Companies Act of its country.
Where a business is located can be called a business area. For example, Doctor Reddy Labs can have business areas in Hyderabad, Bangalore, and Chennai. These help to capture expenses at the business area level. The concept of the business area is slowly becoming obsolete, to be replaced by the Profit Center Accounting (PCA), which we’ll explore in the Controlling (CO) module.
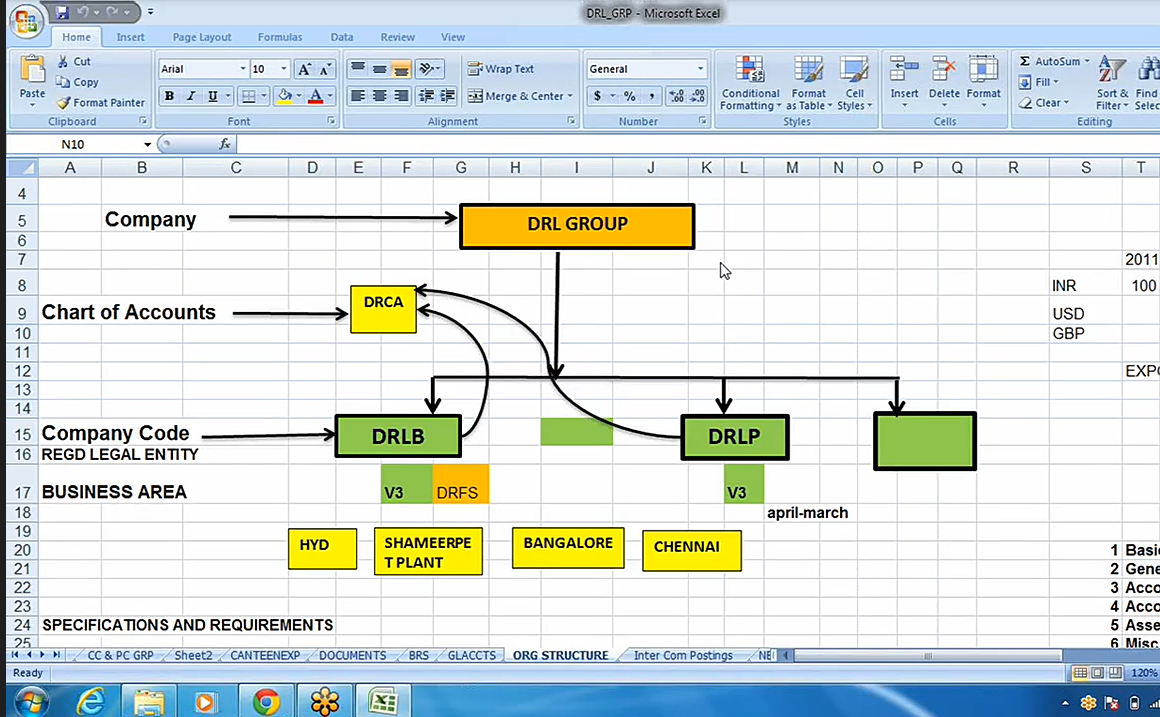
This is called an organizational structure. We can have any number of company codes under one group, even as many as 100 company codes, and a single chart of accounts assigned to all of them.
What is a Chart of Accounts?
A Chart of Accounts is a chart wherein all the General Ledger (GL) accounts required for the companies to prepare their financial statements, including the profit and loss account and balance sheet, are defined. Regardless of the number of company codes, we can use one chart of accounts because subsequently we are going to consolidate the total balance sheet, profit and loss account, and other financial data. Though the company codes might be in different countries, ultimately, when you see the balance sheet and profit and loss (P & L) account of any company, you’ll find the assets, liabilities, income, and expenditure, and this structure of financial statements is the same worldwide. Liabilities could include share capital, secured loans, unsecured loans, results, and surplus. Similarly, assets could include fixed assets, current assets, and investments. So ultimately, the GL accounts are going to be used by whatever number of companies we’ll be looking at. In SAP, we can create GL accounts not just by name, but also with a numbering system.
Now before we go into the SAP implementation, we need to understand their specifications, such as primary language (e.g., English), the applicable accounting standards (e.g., Indian Accounting Standards), the financial year (e.g., April to March or January to December), the local currency of the company code (e g., INR for India). For the configuration process, there are around 21 basic steps to follow.
Core Configuration Steps in SAP FICO
To be able to post accounting entries in a company, some configuration steps are necessary within the SAP system. So, we’ll define these steps.
- Define Company: This involves creating the organizational unit representing the overall group (e.g, DRL Group)
- Define Company Code: Here, we’ll define the individual legal entities within the group (e.g, DRLB, DRLP)
- Assign Company Code to Company: Here, a link will be established between the company code and the company. Otherwise, the system will not understand which company code belongs to which group.
- Create Business Area: Here, we’ll define the various locations or operations within the company.
The first four steps above focus on the organization structure of the company, while the next four steps focus on the General Ledger accounting.
- Define Chart of Accounts (CoA): This involves creating the list of all GL accounts. Any number of GL accounts you are going to create will be defined in the chart of accounts. Here we’ll be using DRCA.
- Assign Chart of Accounts to Company Code: Once we create a chart of accounts, we’ll link up the chart of accounts to the company codes that will utilize it. Logically, the chart of accounts is above the company codes, which means it is at a higher level, so that any number of company codes can be linked to one chart of accounts.
- Define Account Group: Within the chart accounts, we’ll define account groups. The account groups will consist of liabilities, assets, income, and expenditure.
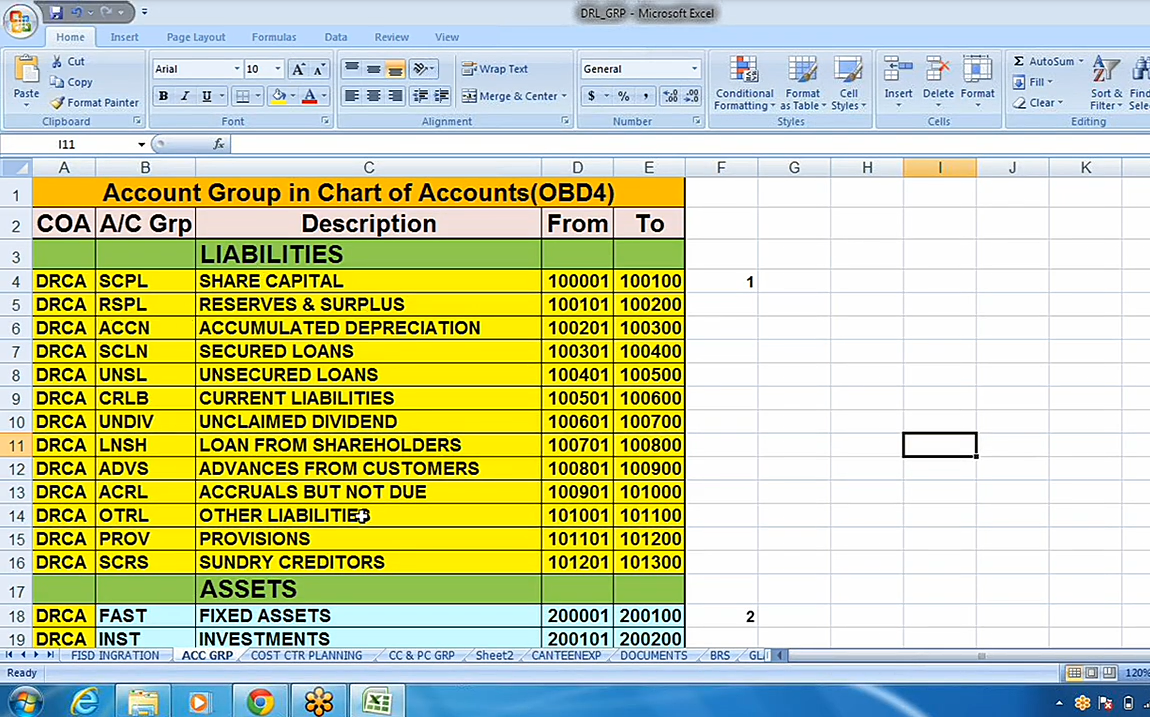
So all the GL accounts are going to be grouped depending on the nature of the accounts. Whatever we have decided based on the requirements of the client, we are going to create the same account groups in the SAP system.
-
- Define Retained Earnings Account: We need to define an account where the company’s retained earnings (i.e., the profit earned by the company after incurring all expenses and after transferring the profits to dividends and other reserves) will be posted to. Whatever the amount that is going to be retained in the P&L account, that will be transferred to the retained earnings account. In SAP, it is a requirement to define a retained earnings account, so that the system knows which account to post to, as it will be used for balance carry forwards and other financial operations.
- Define Fiscal Year Variant: This defines the company’s financial year (e.g., January to December or April to March). The fiscal year needs to be defined and assigned to the company code. There are variants such as V3 for April to March, and K4 for January to December. For example, let’s say the current year is going to start from 1st April 2013 to 31st March 2014. We will have 12 accounting periods; each month is called a period. These periods are called normal posting periods. Normal posting periods are used for regular posting of entries. We also have special periods for the purpose of finalizing accounts.
- Assign Fiscal Year Variant to Company Code: This links the chosen fiscal year variant to the company codes. For example, if V3 is defined as the fiscal year variant, we need to link V3 to the company code. This will help the system understand that this particular company code is going to follow April to March.
The next 3 steps control the posting of accounting entries. To control the posting of accounting entries, SAP uses the Posting Period Variant. This ensures that only the current month is open for postings while restricting backdated or future-dated entries.
- Define Posting Period Variant: This defines a set of rules for opening and closing accounting periods.
- Assign Posting Period Variant to Company Code: Here, we assign the defined posting period variant to the relevant company codes.
- Define Open and Close Posting Period. This determines which accounting periods are currently open for posting. Typically, only the current month is kept open; all other months are kept closed. SAP also provides special periods (usually four) for year-end closing adjustments after the regular fiscal year concludes.
- Define Field Status Variant: This defines which fields are displayed, required, optional, or suppressed during the posting of accounting entries. If a field is suppressed, it will not be visible to the user at the time of accounting entry. If it is required, unless that girl is filled by the user, the system will not allow the entry to be saved. If it is optional, the field will be visible, and whether or not it is filled, the accounting entry can be saved. For example, let’s say there’s a telephone expense accounting entry posted in the general ledger, and I also have different business areas. At the end of the month, I might not be able to tell which business area the telephone expense belongs to if the business area is not specified. So to avoid this, I can make the “Business Area” field a required entry.
- Assign Field Status Variant to the Company Code. The defined field status variant is linked to the company codes, making its field control settings active. For instance, just like in the example above, the “Business Area” field can be made a required entry for certain expense accounts to ensure this information is captured during posting. SAP provides standard field status groups (e.g., G001) tailored for different types of GL accounts (e.g., general ledger, materials, banks). So this is linked to the respective GL account so that all the features that have been chosen, required, optional, suppress, etc, will be applicable when you go to the posting of entries.
- Define Document Types and Number Ranges: Every accounting transaction in SAP is recorded as a document, identified by a unique document number. SAP categorizes these transactions using Document Types (e.g., SA for GL documents, DR for customer invoices, DZ for customer payments, DG for customer credit note). For each document type, a number range is defined to ensure sequential and unique document numbering. SAP provides standard document types, and you can define the specific number ranges for each document type.
- Define Tolerance Group for Employees: This means defining authorization limits for employees, that is, the maximum amount they are allowed to post or approve. Different tolerance groups can be created for various roles. For example, an Accounts Officer may be given an authorization limit of 5 lakhs, so he can pay vendor bills up to 5 lakhs. The Finance Manager may be given 25 lakhs, and the General Manager may be given 50 lakhs.
-
- Assign Tolerance Group to Users: Once the tolerance groups are defined, they need to be assigned to individual users in the system. This ensures that each employee can only carry out transactions within the limits specified in their assigned tolerance group.
- Define Tax Procedure: This defines the calculation logic for various taxes (e.g., sales tax, income tax). At this initial stage, we will create a basic tax procedure, with detailed tax configurations to be handled during the Accounts Receivable (AR) and Accounts Payable (AP) implementation phases.
- Assigned Tax Procedure: Here, we will link the defined tax procedure to the respective country, because tax regulations are generally country-specific.
- Define Global Parameters: This step allows you to review and set certain system-wide parameters. Everything we have defined will all be visible on one screen. Then there’ll be some checkboxes, those we’ll tick, and their uses will be seen as we proceed.
These 21 steps provide a foundational understanding of the initial configuration required in SAP FICO. Let’s now explore how these configurations are performed within the SAP system.
Configuration of the SAP System
The starting point for accessing the SAP system is the SAP Logon Pad, which is typically accessible via an icon on your desktop or laptop. You can freely download SAP GUI (Graphical User Interface), you can type in Google “SAP GUI download”. Once you install that, the SAP Logon Pad icon will appear on your desktop. Clicking on the SAP Logon Pad displays the configured SAP servers.
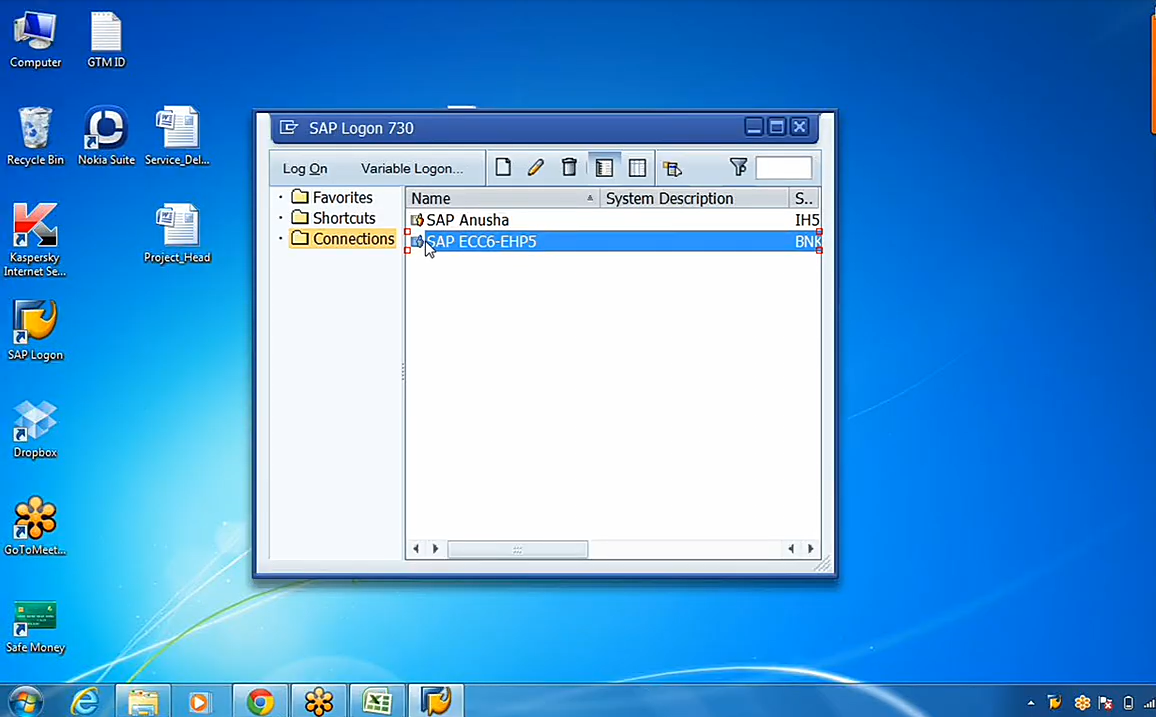
Double-click on the relevant server to connect to the SAP system. Here, I’m using EHP5.
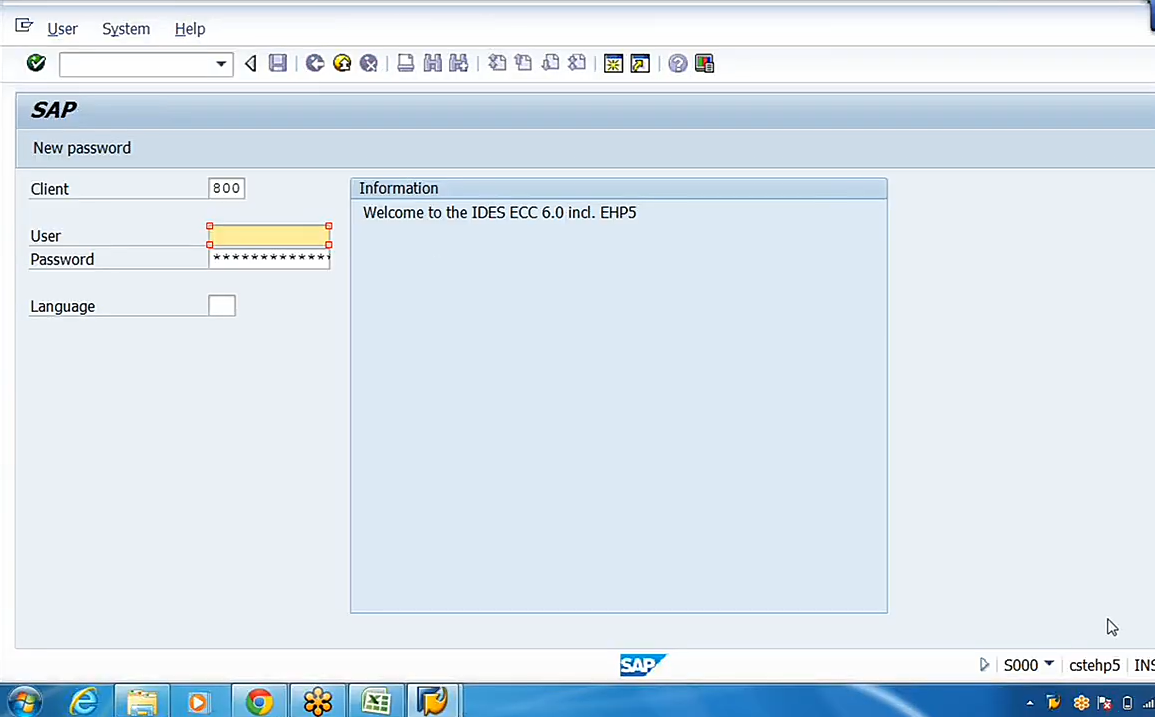
Upon successful login, you’ll land on the SAP Easy Access screen.
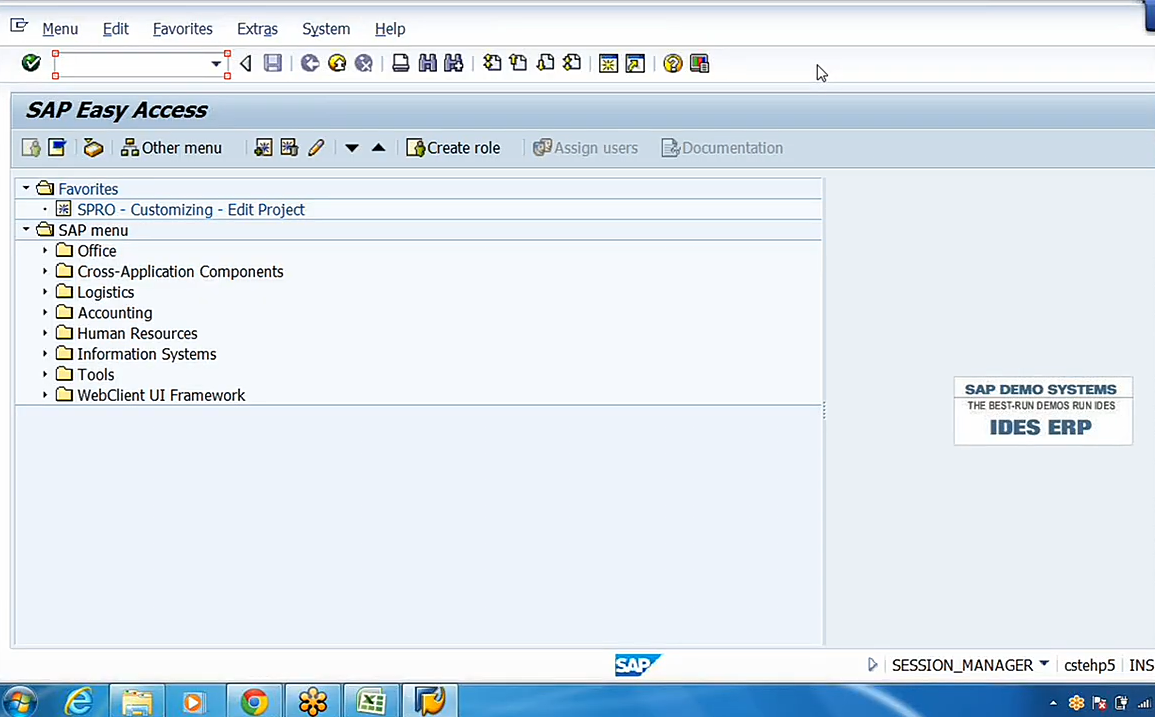
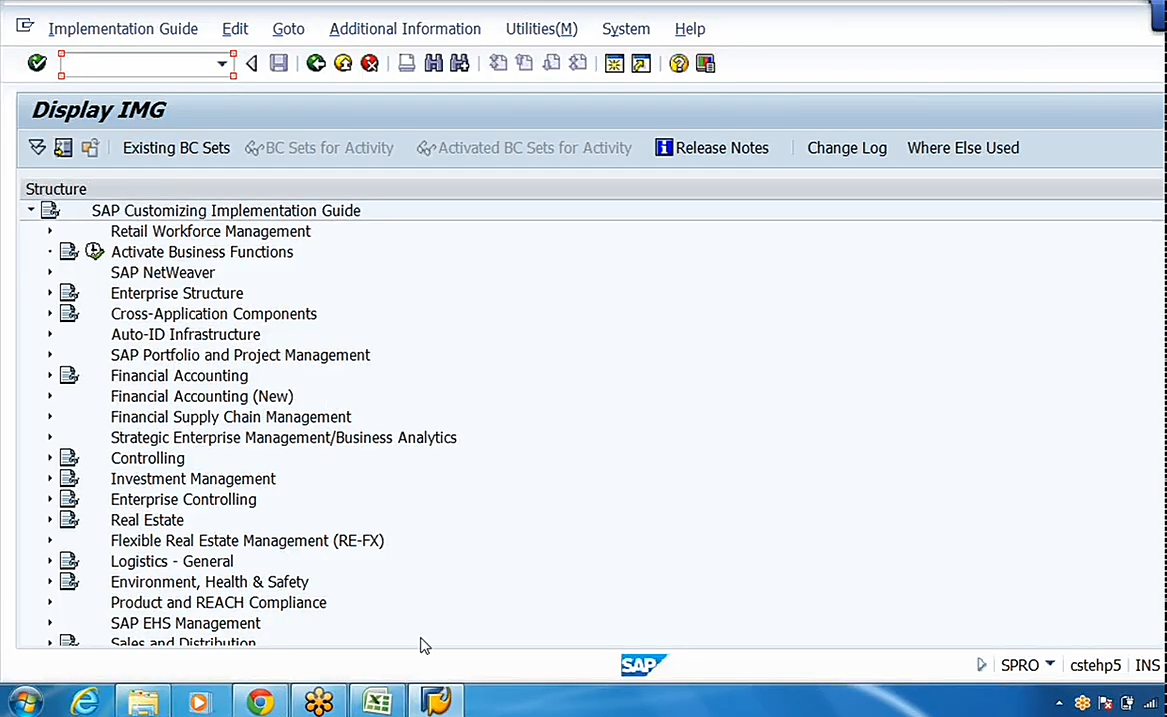
In the easy access screen, you’ll find the menu path. The green Button is ‘Enter’, similar to the Enter button on a keyboard. Next to it is the command box. We have the standard toolbar, which appears for every screen. We also have the title bar and the transaction toolbar, which will change depending on the nature of the transaction. We have the SAP menu, and here you can open each path. The SAP Easy Access screen is the primary interface for end-users, facilitating tasks such as master data creation, report generation, and day-to-day transaction entry. Consultants, however, primarily utilize the IMG (Implementation Guide) screen for system configuration and customization of reports. As a consultant, we need to first configure the system in the IMG and go to the Easy Access Screen for testing. So now we are in the easy access screen. In order to move to the IMG screen from the Easy Access Screen, you use the transaction code SPRO. Transaction codes are shortcuts to specific functionalities within SAP. Enter “SPRO” in the command box (located next to the green “Enter” button) and press Enter. Then, click on “SAP Reference IMG.” This will lead you to the SAP Customizing Implementation Guide screen.
The IMG screen serves as the center for all configuration activities. It is the consultant’s launching pad. Here, you’ll find sections like “Enterprise Structure”, “Financial Accounting”, and “Controlling”, providing access to the various configuration sections.
Let’s begin the configuration process by defining the organization structure/ enterprise structure. First, we’ll define the company. Navigate to: Enterprise Structure -> Definition -> Financial Accounting -> Define Company.
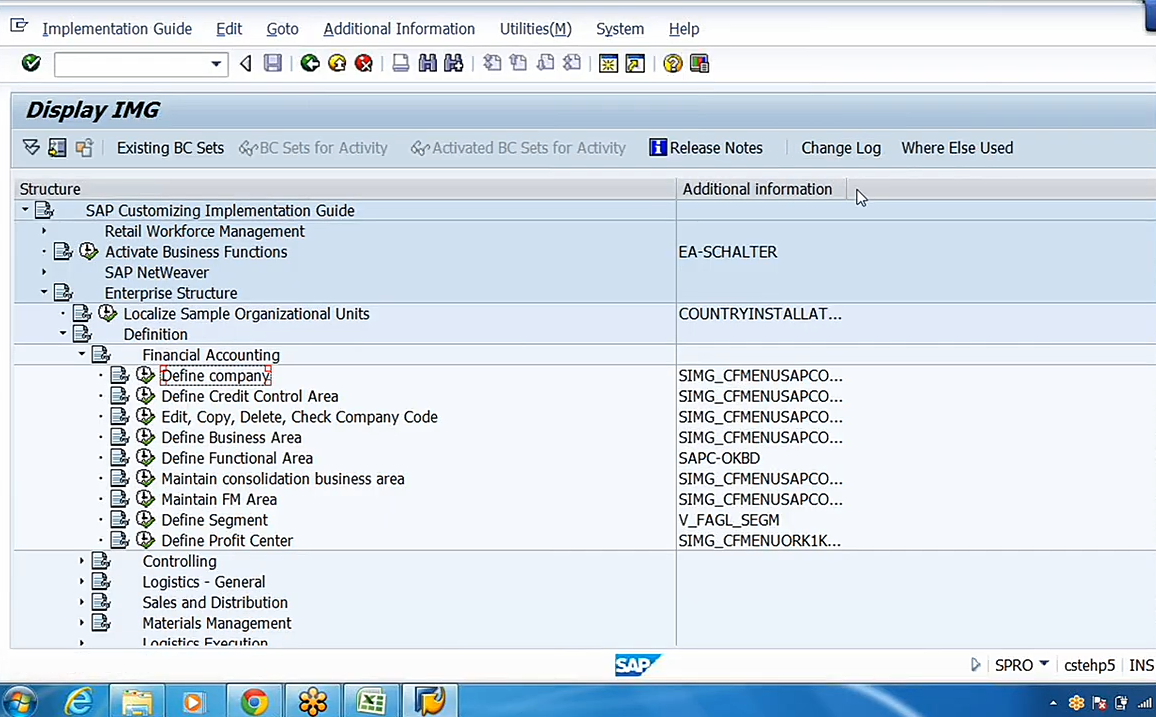
Every screen will have a transaction code. To activate the transaction code for any specific configuration, click on Additional Information in the menu bar, select Display IMG Activity, and then IMG Activity.
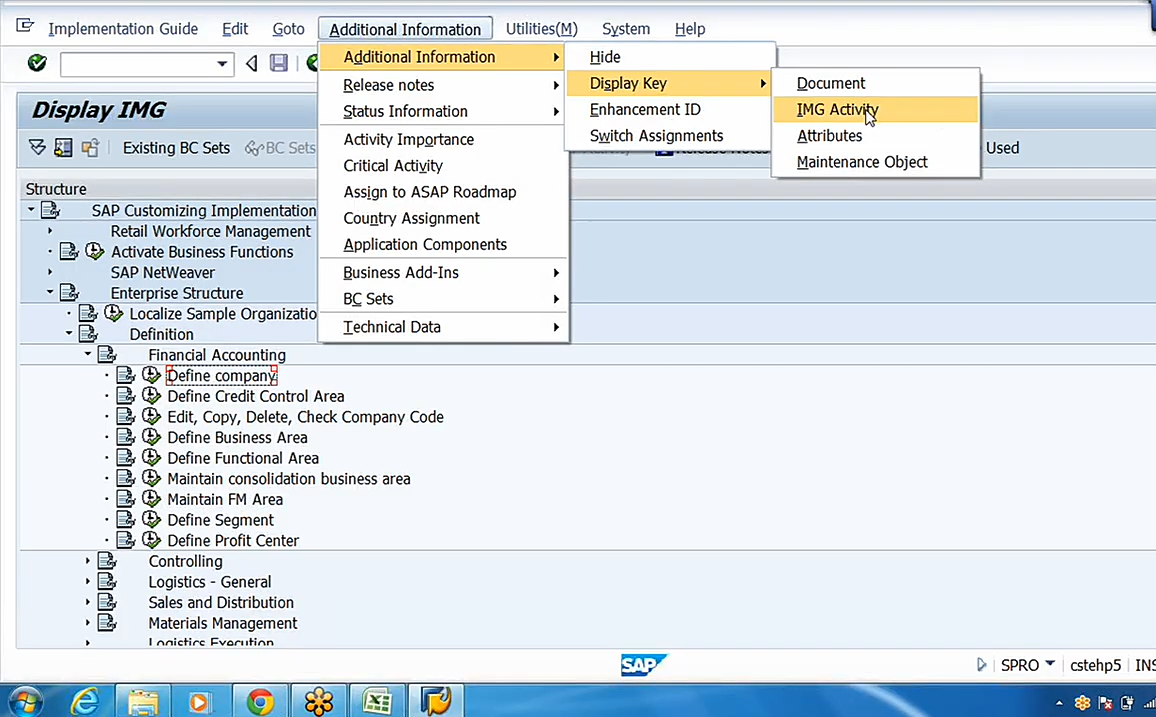
This is the path. The last four digits displayed correspond to the transaction code. Here, you can view the IMG documentation associated with each activity via the “IMG activity documentation” button.
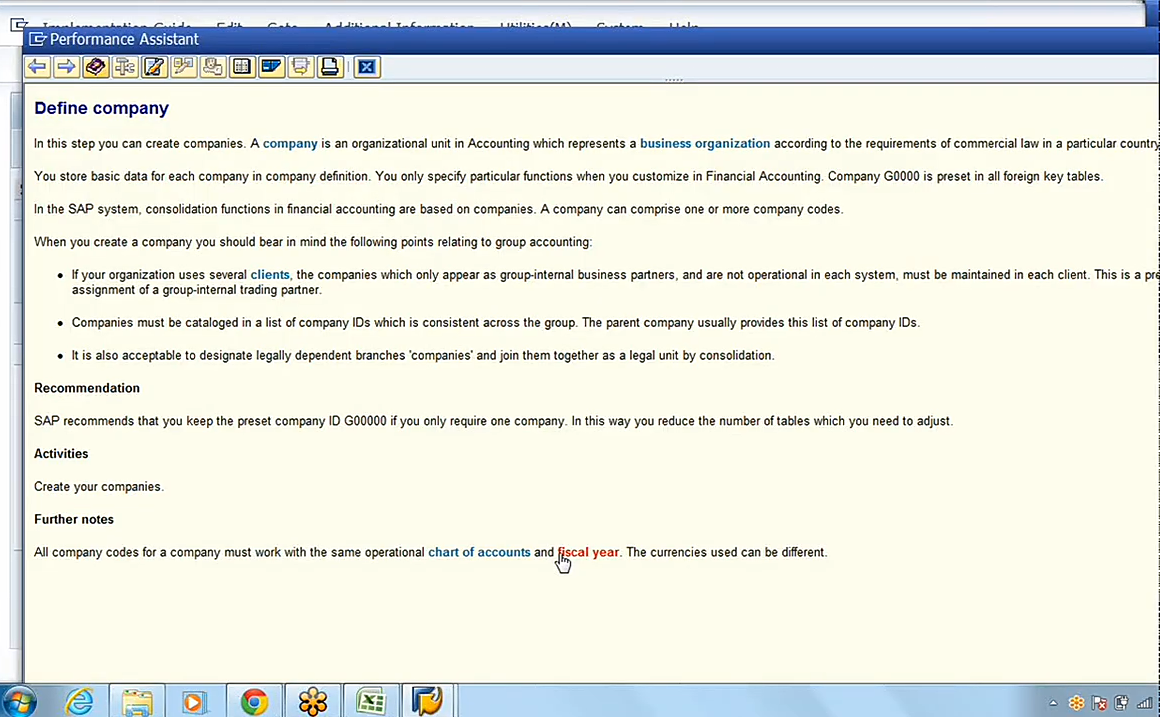
This documentation is very important. You can read it to get a clear understanding of the subject. Click on the “IMG Activity” button (the clock-like icon) to proceed. In the next screen, sample data will be available, but we don’t require the sample data for the time being. We’ll create our own company, Doctor Reddy Labs Group (DRL Group). To create your own company, click on the “New Entries” button.
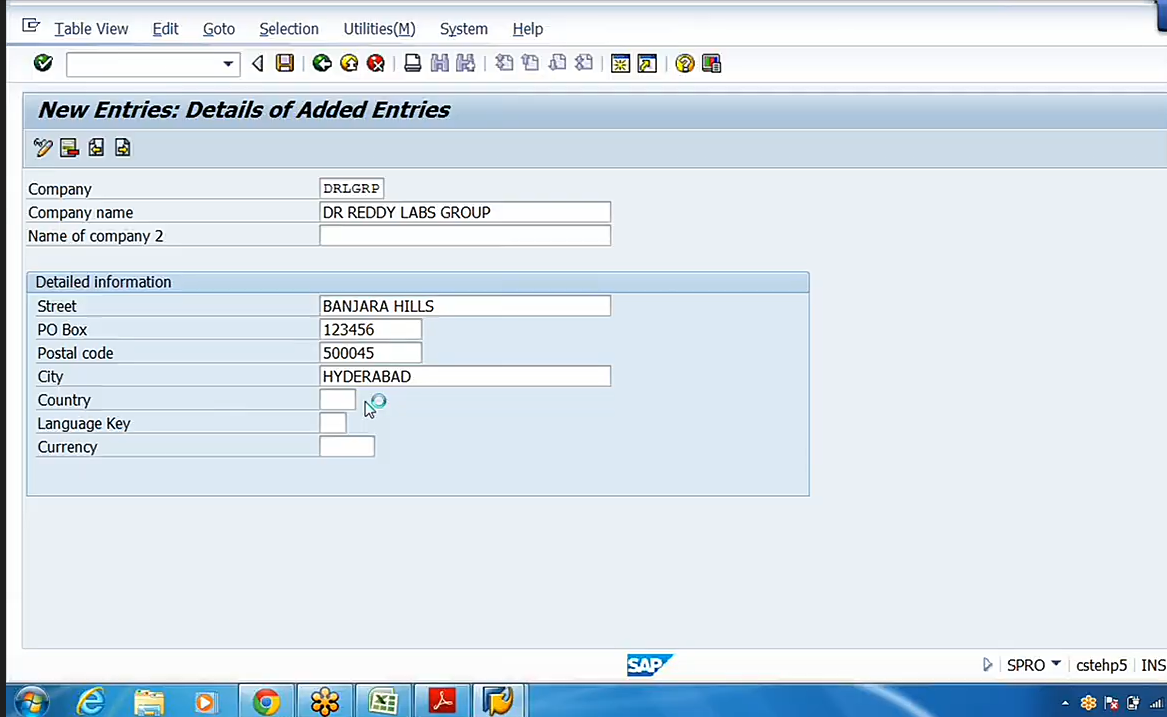
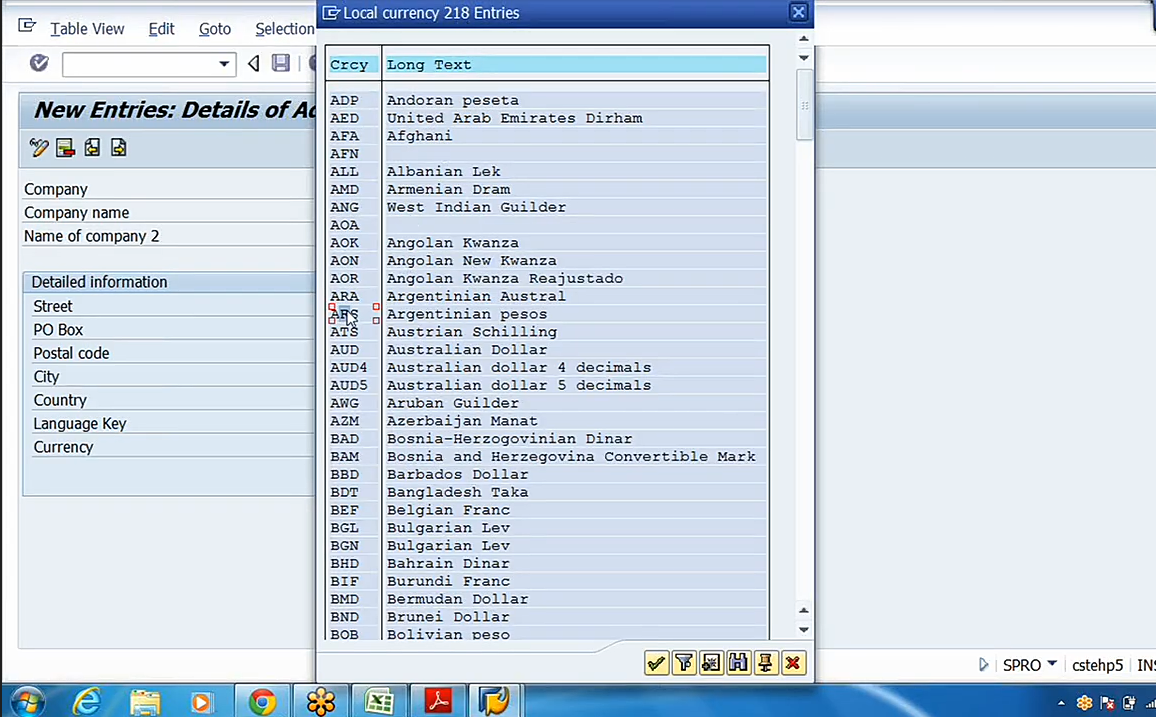
Here, you can define the company details, such as the name (e.g., “DRL Group,” “Doctor Reddy Labs Groups”), address (e.g., “Banjara Hills,” Hyderabad), country (select “India” from the list or enter “IN”), language key (“EN” for English), and currency (“INR”). There are about 218 currencies in the currency list, out of which you can choose “INR” or type “INR”.
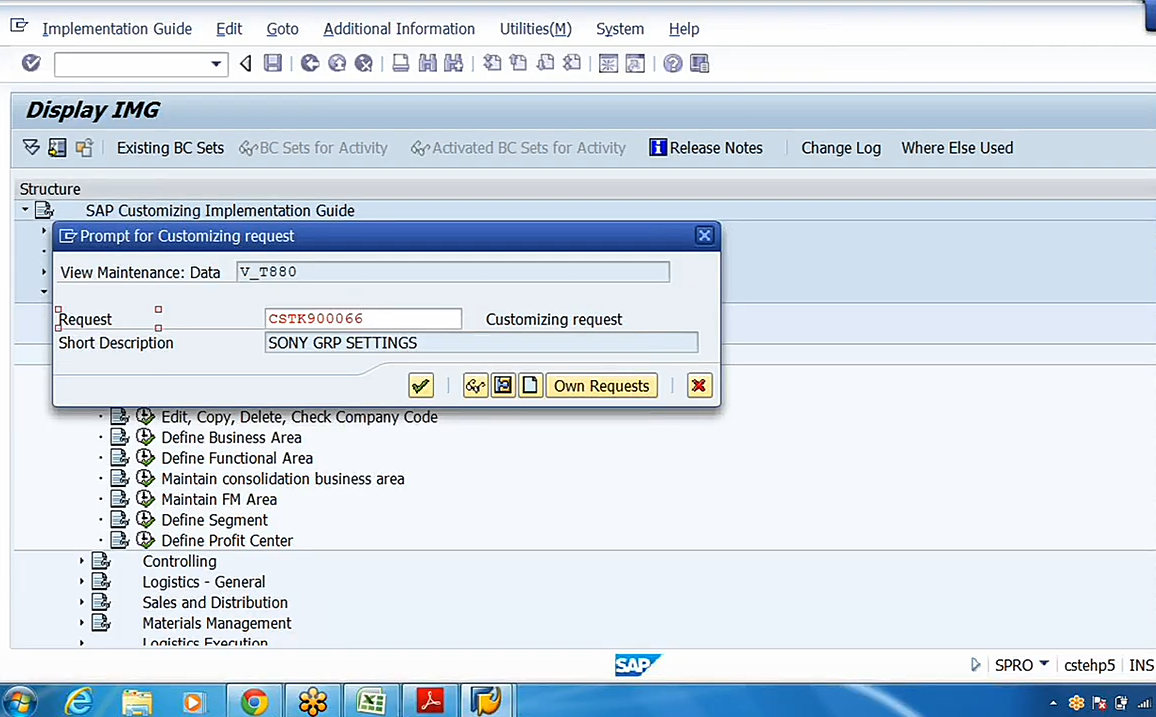
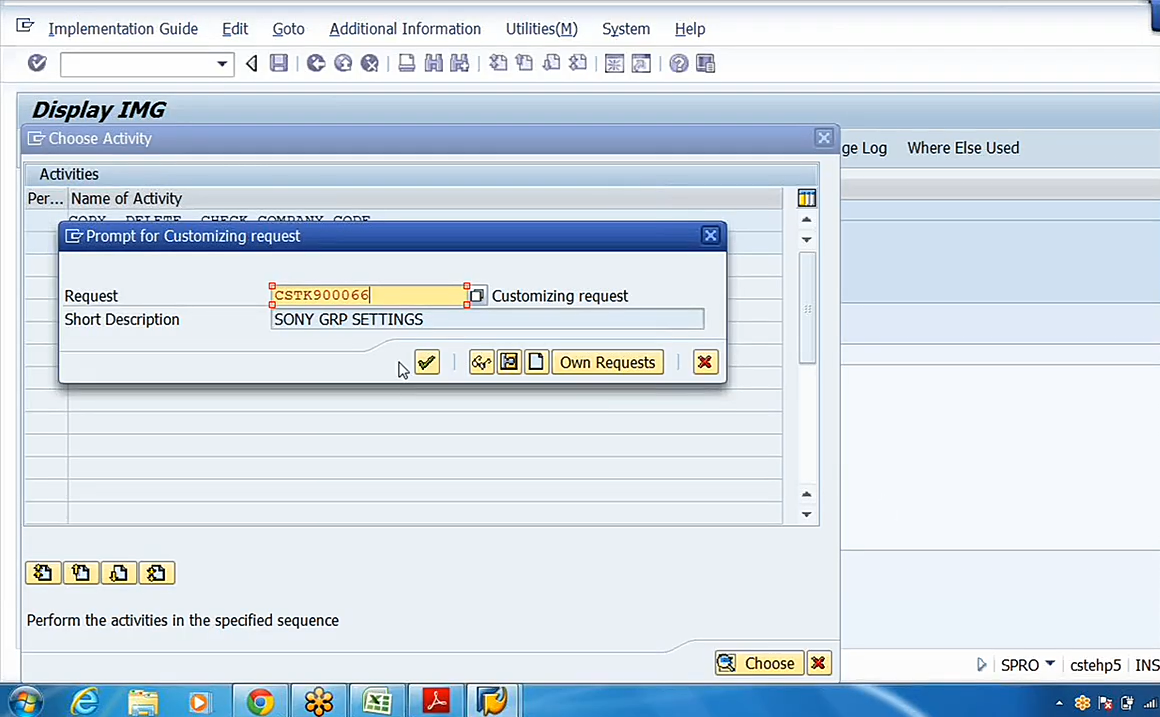
After entering these details, click “Save.” The system will give you a prompt for a request number. This request number is important for tracking and transporting your configurations across different SAP systems within a landscape. Provide a description (e.g., “DRL GRP is our company, and this is a pharmaceutical company”) and save.
The next step is to define a company code. Navigate to: Enterprise Structure -> Definition -> Financial Accounting -> Edit, Copy, Delete, Check Company Code. Click on “Edit company code data” and then “New Entries.” Here, you can create your own company code. Enter the details for your company code, such as the company code itself (e.g., “DRLB”), the company name (“Doctor Reddy Labs Bulk Drugs Limited”), city (“Hyderabad”), country (“IN”), currency (“INR”), and language (“EN”).

After entering these fields, click “Save.” You will be prompted for an address.
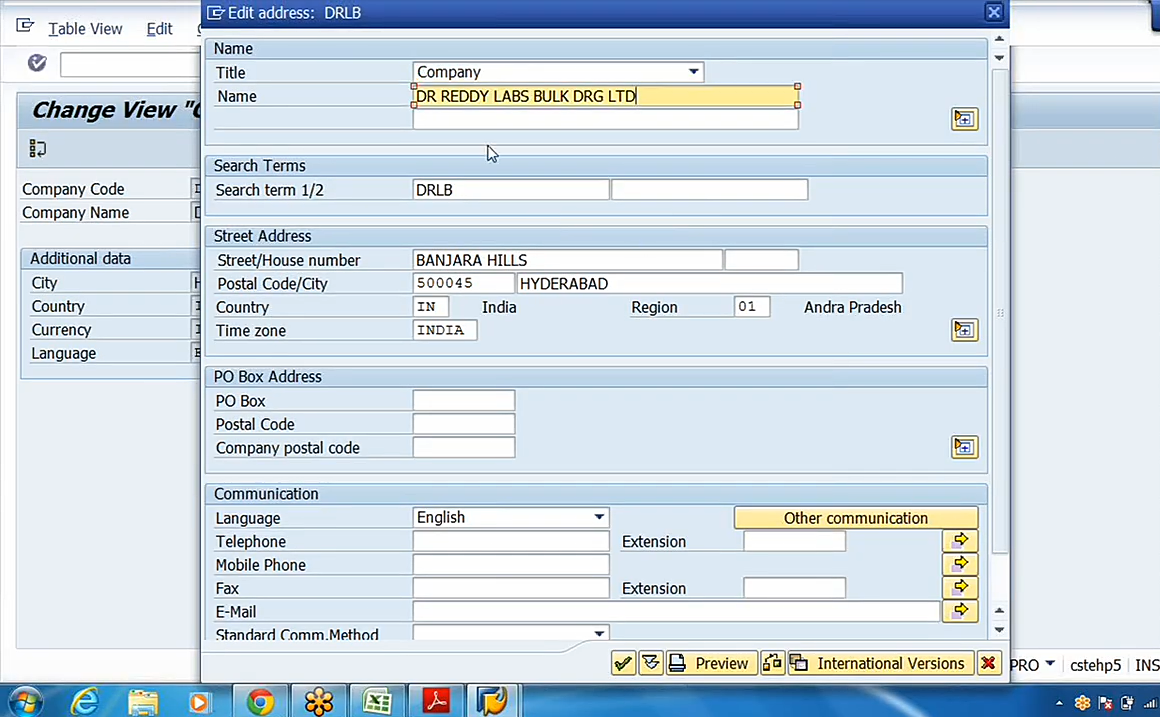
Enter the relevant address details and press Enter. Click “Save” again. The system will generate another request number for these changes.
Coming to step 3, to assign the company code to the company, navigate to: Enterprise Structure -> Assignment -> Financial Accounting -> Assign Company Code to Company.
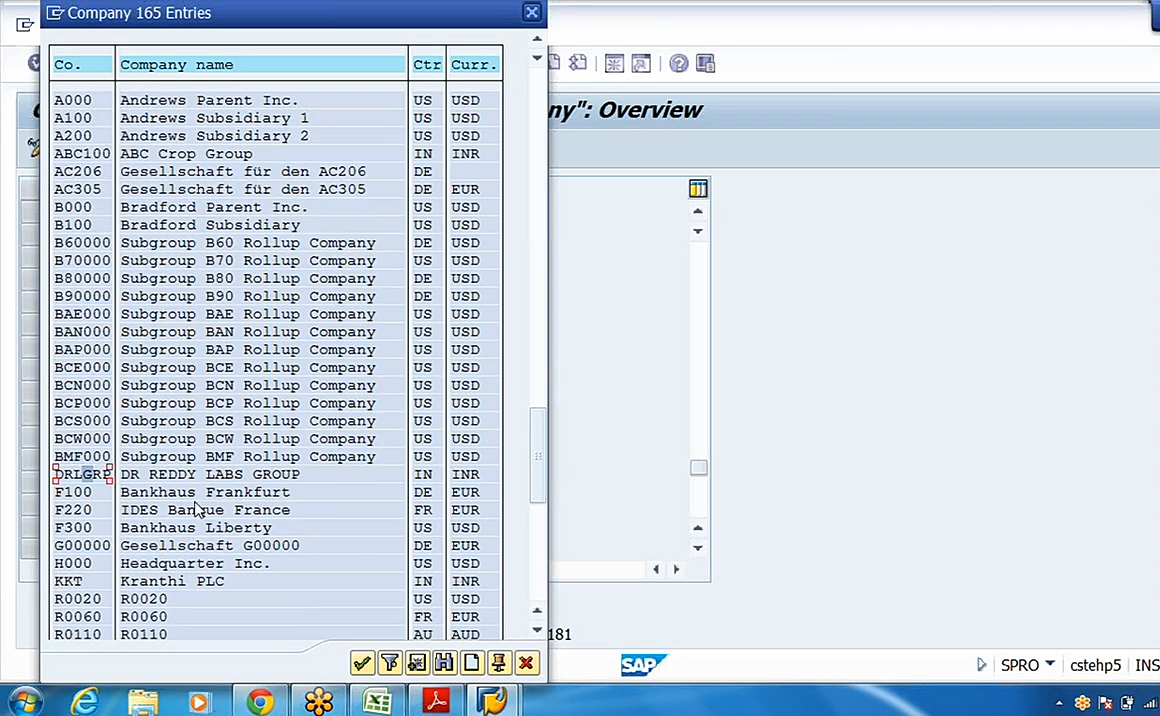
In this screen, locate your company code (e.g., “DRLB”). In the “Company” column next to it, either manually enter your previously defined company (e.g., “DRL Group”) or use the search functionality to find and double-click it.
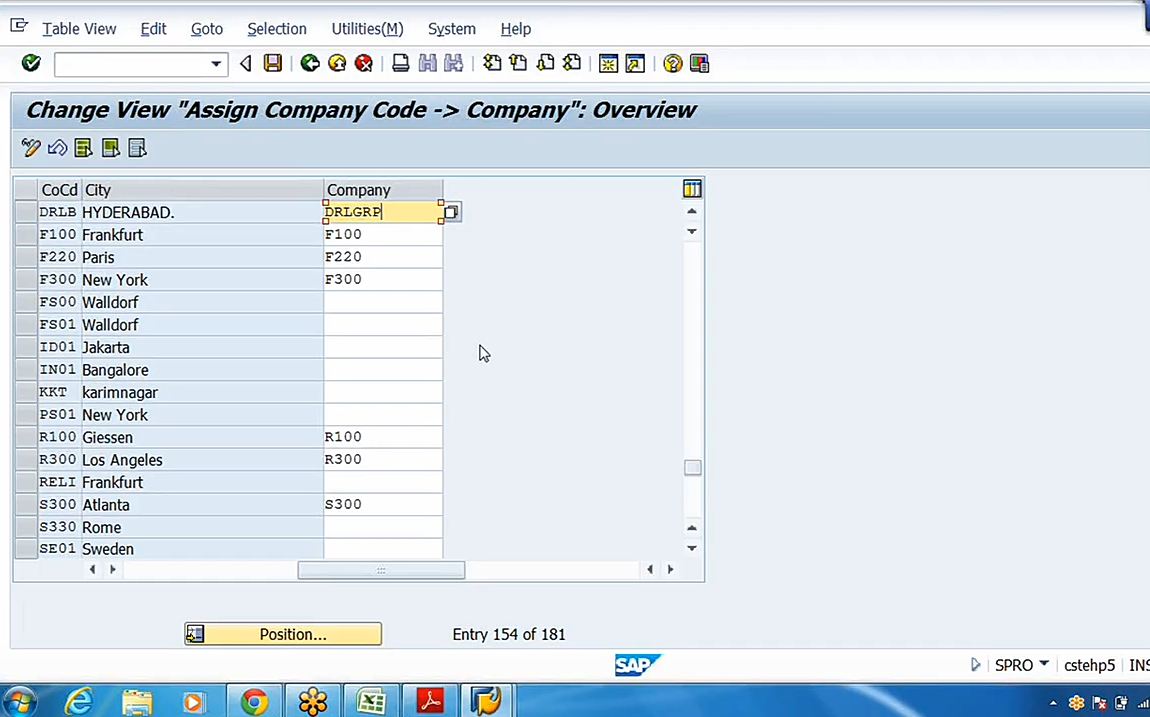
Once the assignment is made, click “Save.” This action links the group company and the individual company code to each other.
These are the fundamental steps involved in configuring the organizational structure within SAP FICO. The subsequent steps will build upon this foundation to establish the complete financial accounting framework.